The prometheus configurations are below. Be sure to give the prometheus service account cluster permissions to GET nodes/proxy and nodes api endpoints.
Google cloud monitor only exposes a small subsection of cAdvisor metrics. With the setup below you’ll be able to collect all of the cAdvisor metrics from GKE. Here are the steps to directly query kubernetes to get cAdvisor metrics and the Prometheus configuration.
1. Create Service
To scrape the cAdvisor endpoint you’ll need to create a service account with cluster permissions to GET nodes/proxy and nodes.
Now that we are in the lets actually make a call api to kubernetes api get the cAdvisor Metrics. Run these individual commands.
# export the KSA bearer token to an env variable
export BEARER_TOKEN=$(cat /var/run/secrets/kubernetes.io/serviceaccount/token)

# Find the first K8s node
 export NODE_NAME=$(curl https://kubernetes.default.svc.cluster.local:443/api/v1/nodes/ -s -H "Authorization: Bearer $BEARER_TOKEN" -k | jq -r .items[0].metadata.name)

# Make an api call to kubernetes using curl
curl https://kubernetes.default.svc.cluster.local:443/api/v1/nodes/$NODE_NAME/proxy/metrics/cadvisor -H "Authorization: Bearer $BEARER_TOKEN" -k
After that you should see metrics for the node
# HELP machine_nvm_capacity NVM capacity value labeled by NVM mode (memory mode or app direct mode).
# TYPE machine_nvm_capacity gauge
machine_nvm_capacity{boot_id="bf88bcb1-f7dc-425d-87cc-ec4994216eb9",machine_id="b1962a4fef066daf20ce3f9adc1ca5e5",mode="app_direct_mode",system_uuid="b1962a4f-ef06-6daf-20ce-3f9adc1ca5e5"} 0
machine_nvm_capacity{boot_id="bf88bcb1-f7dc-425d-87cc-ec4994216eb9",machine_id="b1962a4fef066daf20ce3f9adc1ca5e5",mode="memory_mode",system_uuid="b1962a4f-ef06-6daf-20ce-3f9adc1ca5e5"} 0
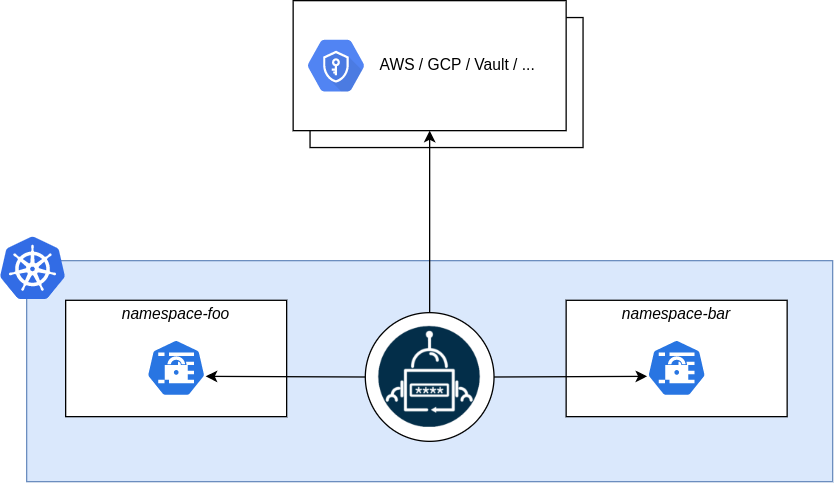
It solves the problem of consistency of your secrets across different environments.
Take for example you have a database password that you store in AWS/GCP secrets manager. You also have that same database password stored as k8s secrets in 5 different namespaces as well. If you update the password you’d have to update it in 6 different places. It would be a pain to have to update everywhere. That’s where the External Secrets Operator makes life so easy.
With External Secrets Operator you’ll make the source of truth be secrets manager. You’ll define a manifest that has a reference to the secret manager secret and the k8s secret will be created with that secret. Please see the example below.
apiVersion: external-secrets.io/v1alpha1
kind: ExternalSecret
metadata:
  name: "hello-world"
spec:
  # This has permission to query Secrets Manager
  secretStoreRef:
    name: secret-store-name
    kind: SecretStore  # or ClusterSecretStore

  # RefreshInterval is the amount of time before the values reading again from the SecretStore provider
  # Valid time units are "ns", "us" (or "µs"), "ms", "s", "m", "h" (from time.ParseDuration)
  # May be set to zero to fetch and create it once
  refreshInterval: "1h"

  # the target describes the secret that shall be created
  # there can only be one target per ExternalSecret
  target:

    # The secret name of the resource
    # Defaults to .metadata.name of the ExternalSecret
    # It is immutable
    name: my-secret # It'll appear as secret name when you run `kubectl get secrets`

  # Data defines the connection between the Kubernetes Secret keys and the Provider data
  data:
    - secretKey: secret-key-to-be-managed # Name of the secret
      remoteRef:
        key: provider-key # name of the Secrets manager secret name
        version: provider-key-version # The version of the Secrets manager secret
How to setup External Secrets Operator in GKE
Lets create a script called run-setup.sh
PROJECT_ID=$(gcloud projects list --filter="$(gcloud config get-value project)" --format="value(PROJECT_ID)")
PROJECT_NUMBER=$(gcloud projects list --filter="$(gcloud config get-value project)" --format="value(PROJECT_NUMBER)")
NAMESPACE=external-secrets
KSA_NAME=external-secrets # This will be created by

CLUSTER_STORE_MANIFEST=cluster-store.yaml
EXTERNAL_SECRET_MANIFEST=external-secret.yaml
GCP_SECRET_NAME=my-secret
K8S_SECRET_NAME=my-k8s-secret-yay

# Installing the helm chart for external secrets. You don't need to be an expert in helm chart
# but I heavily suggest you learn the basics of it.
# Check out Ahmed Elfakharany course on it on udemy
# https://www.udemy.com/share/105eEs3@HJ8aCtyHLG8Xg2rrdoCuepCPztyv_F_KAyXhJXzsKwD-zRl_ojP7th1zyt-_m9co/
helm repo add external-secrets https://charts.external-secrets.io

helm install external-secrets \
   external-secrets/external-secrets \
    -n $NAMESPACE \
    --create-namespace \
    --set installCRDs=true

# Workload Federation. Role is applied directly to KSA
# See https://cloud.google.com/kubernetes-engine/docs/how-to/workload-identity#configure-authz-principals
gcloud projects add-iam-policy-binding projects/$PROJECT_ID \
    --role=roles/secretmanager.secretAccessor \
    --member=principal://iam.googleapis.com/projects/$PROJECT_NUMBER/locations/global/workloadIdentityPools/$PROJECT_ID.svc.id.goog/subject/ns/$NAMESPACE/sa/$KSA_NAME \
    --condition=None


echo -n "my super secret data" | gcloud secrets create $GCP_SECRET_NAME --data-file=-

# ClusterSecretStore represents a secure external location for storing secrets. In actuality it'll make a api call to the Secrets manager to get the secret value
cat > $CLUSTER_STORE_MANIFEST << EOL
---
apiVersion: external-secrets.io/v1beta1
kind: ClusterSecretStore
metadata:
  name: gcp-store
spec:
  provider:
    gcpsm:
      projectID: $PROJECT_ID
EOL

cat > $EXTERNAL_SECRET_MANIFEST << EOL
---
apiVersion: external-secrets.io/v1beta1
kind: ExternalSecret
metadata:
  name: my-external-secret
spec:
  refreshInterval: 1h             # rate SecretManager pulls the secrets manager
  secretStoreRef:
    kind: ClusterSecretStore
    name: gcp-store  # name of the ClusterSecretStore (or kind specified)
  target:
    name: $K8S_SECRET_NAME  # name of the k8s Secret to be created
    creationPolicy: Owner
  data:
    - secretKey: SECRET_KEY
      remoteRef:
        version: "1" # Version of the secret. If not specified it'll use the latest
        key: $GCP_SECRET_NAME # name of the GCP Secrets Manager name

EOL

# We are going to make the cluster store
kubectl apply -f $CLUSTER_STORE_MANIFEST

# We are going to create the external-secret
kubectl apply -f $EXTERNAL_SECRET_MANIFEST
If everything went to plan then a Kubernetes Secret called my-k8s-secret-yay with a data field called SECRET_KEY should have been created.
 $ kubectl get secrets/my-k8s-secret-yay -o json | jq -r .data.SECRET_KEY | base64 -d && echo ""

my super secret data
Author Work Story
I’m using helm charts and argo-cd to manage my k8s clusters. I needed a way to have some consistency between secrets that were in secret manager and the k8s secrets. I started off using helm secrets. It solved the problem of consistency between my k8s secrets and GCP secret manager secrets. However the cracks began to show after I started using argo-cd to control the Continuous Delivery of my apps. It became quickly apparent supporting helm secrets wasn’t going to work out as seen in the documentation to integrate helm secrets with argo-cd. Yikes!
Being able to store the references to GCP secret manager secrets in git without risk of exposing the sensitive information was a Godsend. Give external secrets operator a try and star/contribute to the project if you can.
Did you know about LinkedIn’s Hidden Jobs? Linkedin will hide job postings after a number of people have applied if the job poster doesn’t pay a large sum of money per day for it to be searchable?
Free Job Post
I’ve never posted a job on LinkedIn before so I was very confused by what they meant by posting a “free job post.”
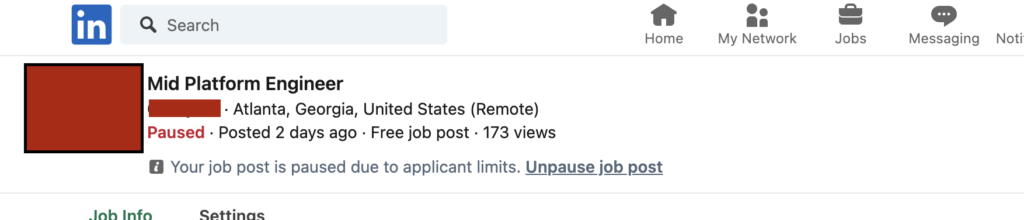
With a free job, up to 10 applicants can apply after that the job is “paused.”
Paused Jobs – LinkedIn’s Hidden Jobs
Good News:
Applicants can still apply to the job
Its still technically free
Bad News:
The Job is no longer searchable on the jobs page. Meaning if you are searching for jobs that doesn’t have 600 applicants you are S.O.L.
Paused Job
After 50 or so people apply for the free job LinkedIn will automatically CLOSE THE APPLICATION TO NEW APPLICANTS.
Closed Job Application
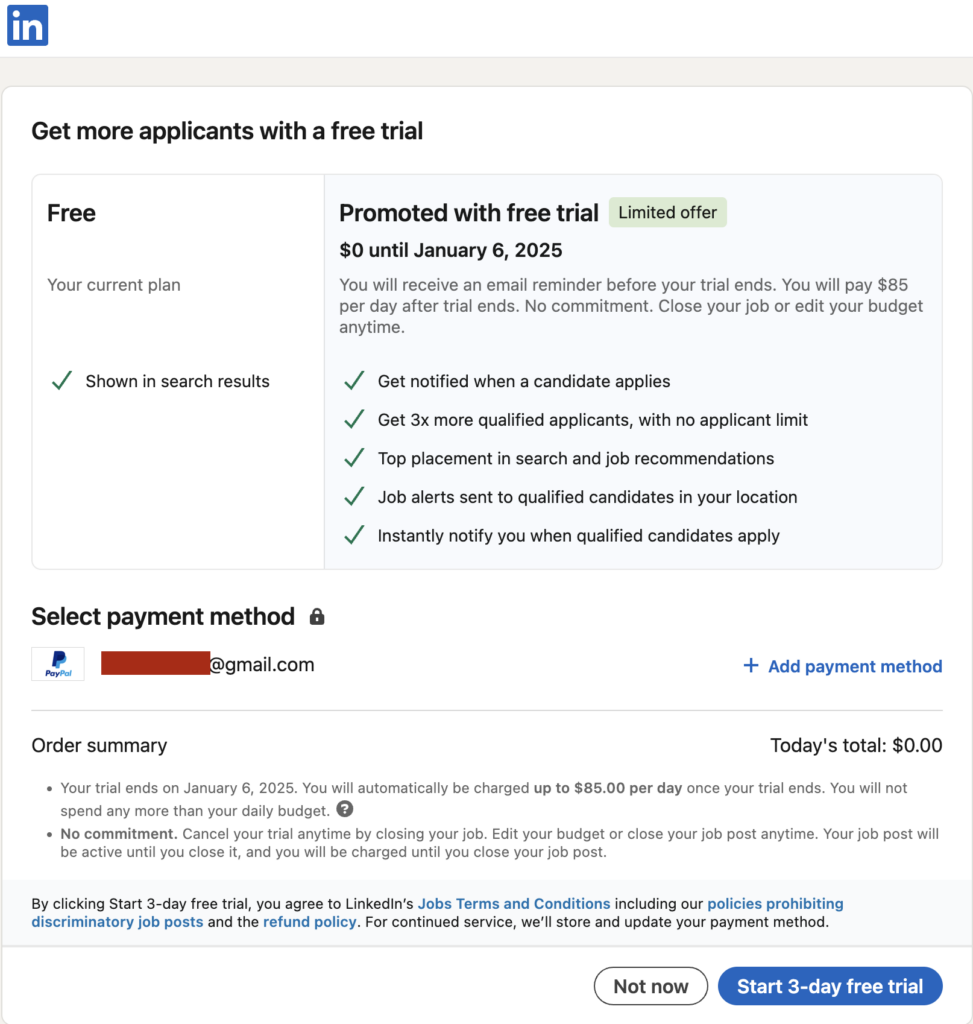
Unpausing Jobs
If you want to unpause the job then its no problem. You just need to pay up to $85 a dollars a day so that your job is searchable.
Pay up or be hidden
Now as you can imagine this can become very expensive. Lets do a quick example example.
Lets say that you need to fulfill 15 position and you want them searchable for atleast two weeks
15 positions * 14 days * $85 =
$17,850
That is a lot of money to spend in two weeks.
Why Should you care?
If you are an employer:
You should care because this can be very expensive
If you are looking for a job:
You should care because a majority of the jobs you can apply to aren’t easily searchable. The only why you can find a “paused” job is if somebody shares the job link with you or you were to go on the companies Linkedin page and looked under their jobs section.
Its impractical to go to every single company and search their jobs page the manually. So many of these jobs would go unnoticed by many qualified job seekers.
Conclusion
Back in march of 2024 when I was looking for a new position if I had known about the hidden jobs I would have built a crawler to find paused jobs and apply to them if they matched what I was looking for haha.
LinkedIn would never release these stats but I’d be interested in seeing how many jobs exist that are still accepting applications but are paused.
Good luck to those looking for jobs.
Good luck to employers who have to shell out large amounts of money to find those job seekers.
$ for i in {1..200}; do gcloud pubsub topics publish echo --message="Autoscaling #${i}"; done
Its going to take a few minutes for the scaling to occur.
Watch as the pod count goes up. Eventually you’ll see the targets start to go up
$ watch kubectl get hpa -n default

NAME                           REFERENCE           TARGETS     MINPODS   MAXPODS   REPLICAS   AGE
keda-hpa-pubsub-scaledobject   Deployment/pubsub   2/5 (avg)   1         2         2          10m
TroubleShooting
You see the dreaded <unkown>/5 error.
This can happen for a variety of reasons. Its best to check the output of all the commands and make sure they all work. If any of them failed then the hpa setup will fail.
Argocd makes it easy to manage multiple kubernetes clusters with a single a single instance of Argocd. Lets get to it
Assumptions
You have a remote cluster you already want to manage.
You are using GKE
This guide can still help you. Just make sure the argocd-server and the argocd-application-controller service accounts have admin permissions to the remote cluster.
You are using helm to manage argocd.
If not then dang that must be rough.
You have the ability to create service accounts with container admin permissions.
Or argocd-server and the argocd-application-controller service accounts have admin permissions to the remote cluster.
Bind the iam.workloadIdentityUser role to the kubernetes Service accounts argocd-server & argocd-application-controller so that it can impersonate the service account that will be created.
Here’s a simple script to do just that. Call it create-gsa.sh.
PROJECT_ID=$(gcloud projects list --filter="$(gcloud config get-value project)" --format="value(PROJECT_ID)")
SERVICE_ACCOUNT_NAME=argo-cd-01
PROJECT_NUMBER=$(gcloud projects list --filter="$(gcloud config get-value project)" --format="value(PROJECT_NUMBER)")


gcloud iam service-accounts create $SERVICE_ACCOUNT_NAME \
  --description="custom metrics stackdriver" \
  --display-name="custom-metrics-stackdriver"
echo "Created google service account(GSA) $SERVICE_ACCOUNT_NAME@$PROJECT_ID.iam.gserviceaccount.com"

sleep 5 #Sleep is because iam policy binding fails sometimes if its used to soon after service account creation


gcloud projects add-iam-policy-binding $PROJECT_ID \
 --role roles/container.admin	 \
 --member serviceAccount:$SERVICE_ACCOUNT_NAME@$PROJECT_ID.iam.gserviceaccount.com
echo "added role monitoring.viewer to GSA $SERVICE_ACCOUNT_NAME@$PROJECT_ID.m.gserviceaccount.com"

# Needed so KSA can impersonate GSA account
gcloud iam service-accounts add-iam-policy-binding  \
  --role roles/iam.workloadIdentityUser \
  --member "serviceAccount:$PROJECT_ID.svc.id.goog[argocd/argocd-server]" \
  $SERVICE_ACCOUNT_NAME@$PROJECT_ID.iam.gserviceaccount.com
echo "added iam policy for KSA serviceAccount:$PROJECT_ID.svc.id.goog[argocd/argocd-server]"

# Needed so KSA can impersonate GSA account
gcloud iam service-accounts add-iam-policy-binding  \
  --role roles/iam.workloadIdentityUser \
  --member "serviceAccount:$PROJECT_ID.svc.id.goog[argocd/argocd-application-controller]" \
  $SERVICE_ACCOUNT_NAME@$PROJECT_ID.iam.gserviceaccount.com
echo "added iam policy for KSA serviceAccount:$PROJECT_ID.svc.id.goog[argocd/argocd-application-controller]"
Get IP & Certificate Authority of the Remote K8s Clusters
Get Public IP and Unencoded Cluster Certificate
In the console
Go to the cluster details
Look under the Control Plane Networking section the public endpoint and the text “Show cluster certificate.”
Press the “Show cluster certificate” button to get the certificate.
Example of getting Cluster Certificate & Public Cluster IP
Base64 Encode Cluster Certificate
Copy the certificate to a file called cc.txt
Run the base64 command to encode the certificate
Be sure to copy everything including the BEGIN/END CERTIFICATE
base64 cc.txt -w 0 && echo ""
Create Argocd Helm Chart Values File
Add the base64 encode cluster certificate and public IP to the CLUSTER_CERT_BASE64_ENCODED & CLUSTER_IP respectively.
Create a bash script create-yaml.sh and execute
PROJECT_ID=$(gcloud projects list --filter="$(gcloud config get-value project)" --format="value(PROJECT_ID)")
SERVICE_ACCOUNT_NAME=argo-cd-01
PROJECT_NUMBER=$(gcloud projects list --filter="$(gcloud config get-value project)" --format="value(PROJECT_NUMBER)")
CLUSTER_CERT_BASE64_ENCODED=""
CLUSTER_IP="" # Example 35.44.34.111. DO NOT INCLUDE "https://"

cat > values.yaml <<EOL
configs:
  clusterCredentials:
    remote-cluster:
      server:  https://${CLUSTER_IP}
      config:
        {
          "execProviderConfig": {
            "command": "argocd-k8s-auth",
            "args": [ "gcp" ],
            "apiVersion": "client.authentication.k8s.io/v1beta1"
          },
          "tlsClientConfig": {
            "insecure": false,
            "caData": "${CLUSTER_CERT_BASE64_ENCODED}"
          }
        }
  rbac:
    ##################################
    # Assign admin roles to users
    ##################################
    policy.default: role:readonly  # ***** Allows you to view everything without logging in.
    policy.csv: |
      g, myAdmin, role:admin
  ##################################
  # Assign permission login and to create api keys for  users
  ##################################
  cm:
    accounts.myAdmin: apiKey, login
    users.anonymous.enabled: true
  params:
    server.insecure: true #communication between services is via http

  ##################################
  #  Assigning the password to the users. Argo-cd uses bycypt.
  #  To generate a new password use https://bcrypt.online/ to generate a new password and add it here.
  ##################################
  secret:
    extra:
      accounts.myAdmin.password: \$2y\$10\$p5knGMvbVSSBzvbeM1tLne2rYBW.4L6aJqN.Fp1AalKe3qh3LuBq6 #fancy_password
      accounts.myAdmin.passwordMtime: 1970-10-08T17:45:10Z


controller:
  serviceAccount:
    annotations:
      iam.gke.io/gcp-service-account: ${SERVICE_ACCOUNT_NAME}@${PROJECT_ID}.iam.gserviceaccount.com

server:
  serviceAccount:
    annotations:
      iam.gke.io/gcp-service-account: ${SERVICE_ACCOUNT_NAME}@${PROJECT_ID}.iam.gserviceaccount.com
  service:
    type: LoadBalancer


EOL
If you run helm upgrade make sure you delete the argocd-server and argocd-application-controller pods to make sure the the service account changes took effect.
Confirm everything is working
You can create your own application on the remote server or can run this script to create one. Create a bash script called apply-application.sh and execute it.
YAML_FILE_NAME="guestbook-application.yaml"

cat > $YAML_FILE_NAME << EOL
---
apiVersion: argoproj.io/v1alpha1
kind: Application
metadata:
  name: guestbook
  namespace: argocd
spec:
  destination:
    namespace: guestbook
    name:  remote-cluster #Name of the remote cluster
  project: default
  source:
    path: helm-guestbook
    repoURL: https://github.com/argoproj/argocd-example-apps # Check to make sure this still exists
    targetRevision: HEAD
  syncPolicy:
    automated:
      selfHeal: true
    syncOptions:
      - CreateNamespace=true

EOL

kubectl apply -f $YAML_FILE_NAME
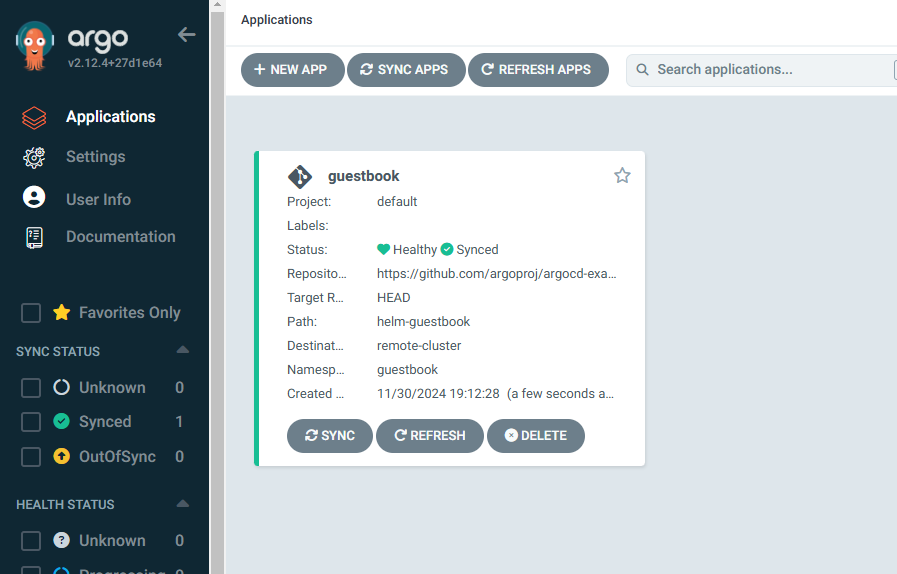
The Application should have successfully been automatically synced and healthy.
Troubleshooting
If you did a helm upgrade instead of a helm install then you may want to delete the argocd-server and argocd-application-controller pods to make sure the the service account changes took effect.
GCP Horizontal Pod Autoscaling with Pub/Sub shouldn’t be as complicated as it is. I’m not sure why but following this GCP article it appears workload identity doesn’t work with the stack driver.
I instead did it the “old” way of using Google Service Accounts instead.
Assumptions
You already have a k8s cluster running.
You have kubectl installed and you are authenticated into your cluster
You have admin permissions with GKE to do the following
Create pub/sub topics & subscriptions
Create service accounts
Admin permissions inside of your k8s cluster
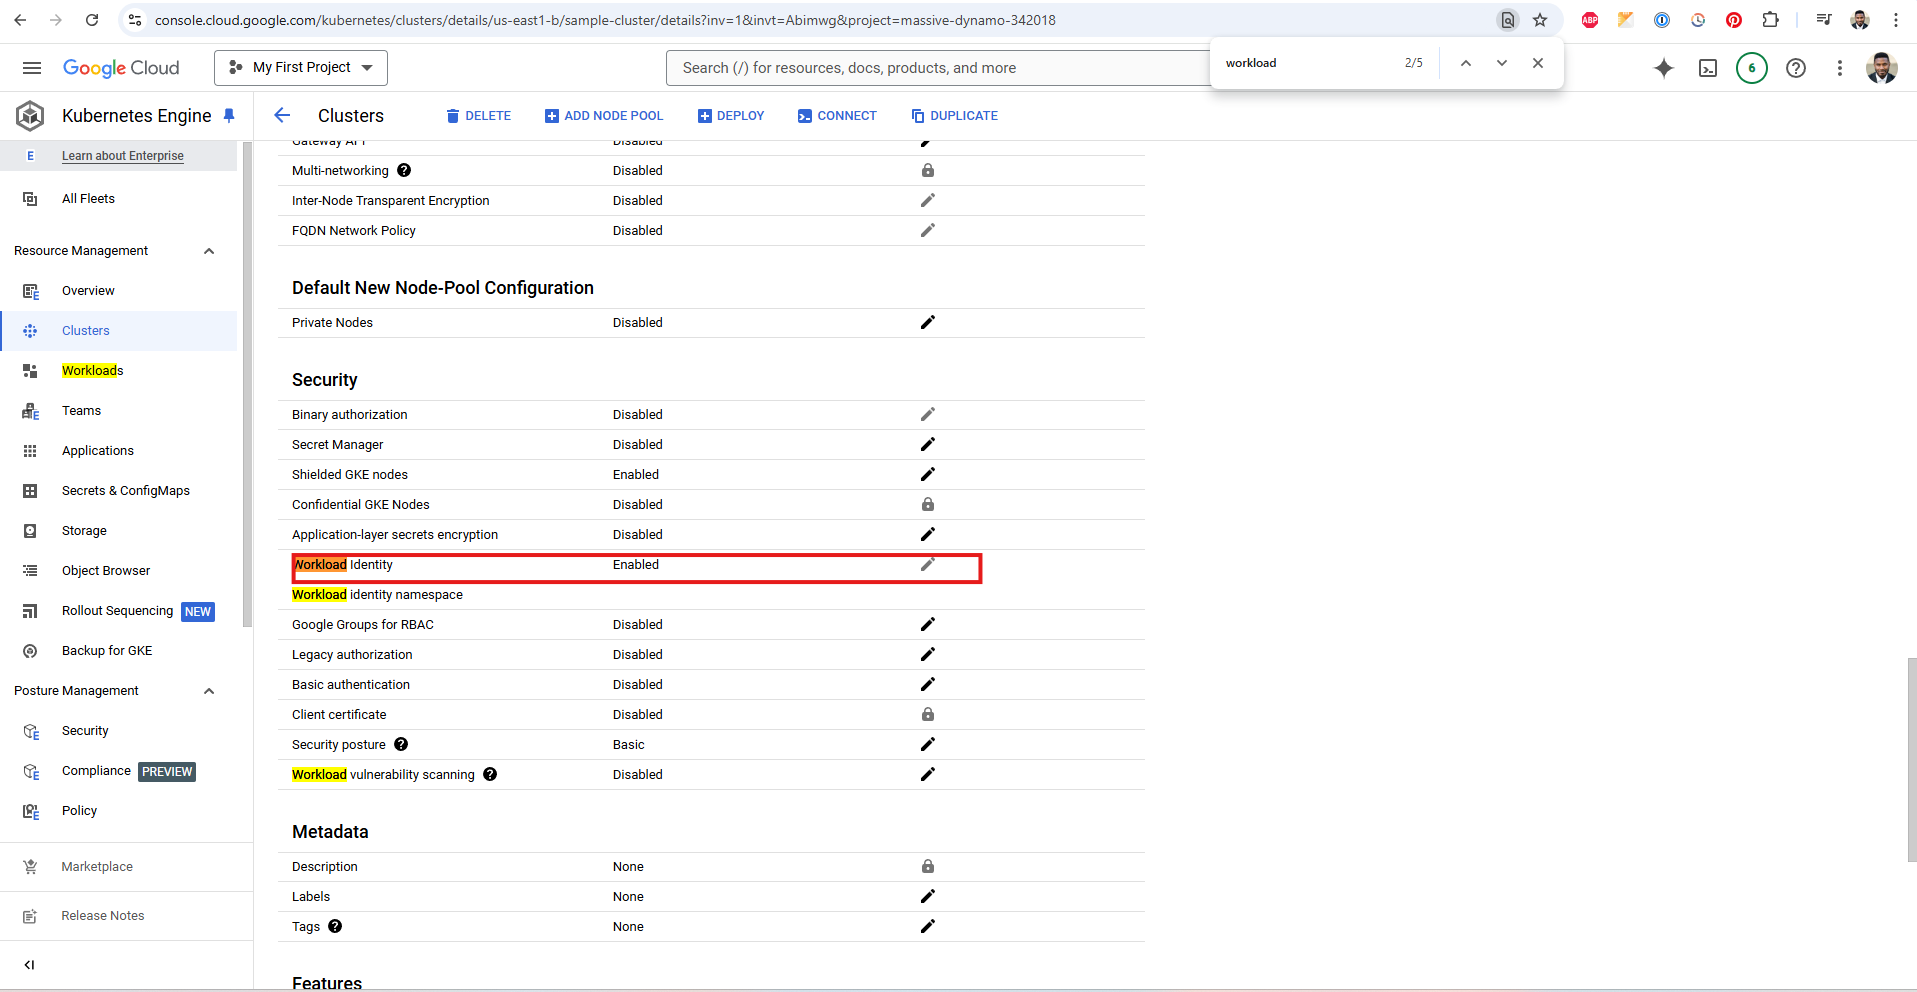
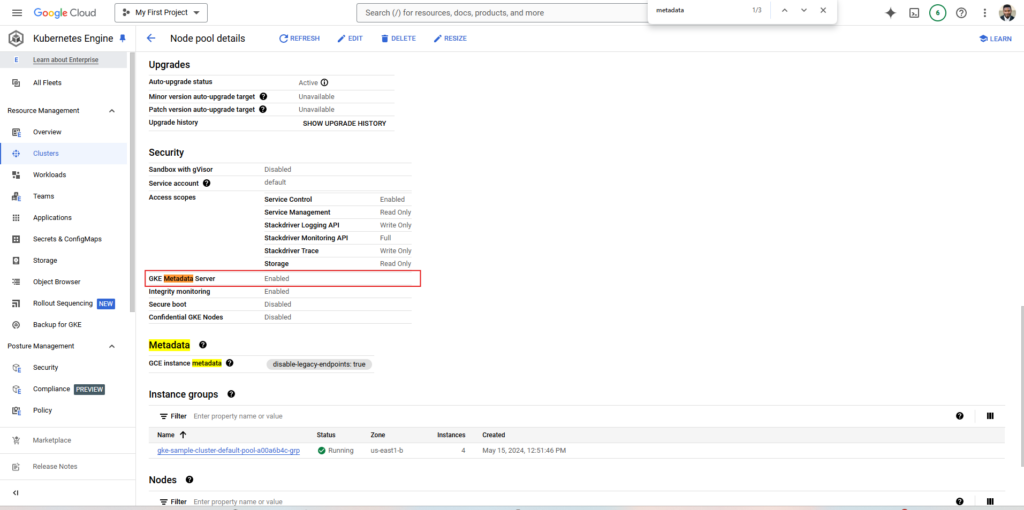
You already have workload identity turned on for BOTH you cluster and node pool
Cluster with workload identityNode Page with GKE Metadata Server enabled
If all the assumptions are true then your ready to run the script below. If not follow this guide GCP guide up until the “Deploying the Custom Metrics Adapter.”
Lets Get Down to HPA
First create a manifest file for a application and call the file test-app.yaml
This manifest will be called by the script below so make sure its in the working directory when you execute the script
import datetime
import time

# [START gke_pubsub_pull]
# [START container_pubsub_pull]
from google import auth
from google.cloud import pubsub_v1


def main():
    """Continuously pull messages from subsciption"""

    # read default project ID
    _, project_id = auth.default()
    subscription_id = 'echo-read'

    subscriber = pubsub_v1.SubscriberClient()
    subscription_path = subscriber.subscription_path(
        project_id, subscription_id)

    def callback(message: pubsub_v1.subscriber.message.Message) -> None:
        """Process received message"""
        print(f"Received message: ID={message.message_id} Data={message.data}")
        print(f"[{datetime.datetime.now()}] Processing: {message.message_id}")
        time.sleep(3)
        print(f"[{datetime.datetime.now()}] Processed: {message.message_id}")
        message.ack()

    streaming_pull_future = subscriber.subscribe(
        subscription_path, callback=callback)
    print(f"Pulling messages from {subscription_path}...")

    with subscriber:
        try:
            streaming_pull_future.result()
        except Exception as e:
            print(e)
# [END container_pubsub_pull]
# [END gke_pubsub_pull]


if __name__ == '__main__':
    main()
Next create bash script called run-example.sh
PROJECT_ID=$(gcloud projects list --filter="$(gcloud config get-value project)" --format="value(PROJECT_ID)")
SERVICE_ACCOUNT_NAME=custom-metrics-stackdriver
PROJECT_NUMBER=$(gcloud projects list --filter="$(gcloud config get-value project)" --format="value(PROJECT_NUMBER)")
EXAMPLE_NAMESPACE=default
PUBSUB_TOPIC=echo
PUBSUB_SUBSCRIPTION=echo-read

create (){

  kubectl apply -f https://raw.githubusercontent.com/GoogleCloudPlatform/k8s-stackdriver/master/custom-metrics-stackdriver-adapter/deploy/production/adapter_new_resource_model.yaml
  sleep 5
  kubectl apply -f https://raw.githubusercontent.com/GoogleCloudPlatform/k8s-stackdriver/master/custom-metrics-stackdriver-adapter/deploy/production/adapter_new_resource_model.yaml
  # running twice to make sure its being created
  echo "Created custom-metrics namespace and additional resources"

  gcloud iam service-accounts create $SERVICE_ACCOUNT_NAME \
    --description="custom metrics stackdriver" \
    --display-name="custom-metrics-stackdriver"
  echo "Created google service account(GSA) $SERVICE_ACCOUNT_NAME@$PROJECT_ID.iam.gserviceaccount.com"

  sleep 5 #Sleep is because iam policy binding fails sometimes if its used to soon after service account creation

  gcloud projects add-iam-policy-binding $PROJECT_ID \
   --role roles/monitoring.viewer \
   --member serviceAccount:$SERVICE_ACCOUNT_NAME@$PROJECT_ID.iam.gserviceaccount.com
  echo "added role monitoring.viewer to GSA $SERVICE_ACCOUNT_NAME@$PROJECT_ID.iam.gserviceaccount.com"

  gcloud iam service-accounts add-iam-policy-binding  \
    --role roles/iam.workloadIdentityUser \
    --member "serviceAccount:$PROJECT_ID.svc.id.goog[custom-metrics/custom-metrics-stackdriver-adapter]" \
    $SERVICE_ACCOUNT_NAME@$PROJECT_ID.iam.gserviceaccount.com
  echo "added iam policy for KSA custom-metrics-stackdriver-adapter"

  kubectl annotate serviceaccount --namespace custom-metrics \
    custom-metrics-stackdriver-adapter \
    iam.gke.io/gcp-service-account=$SERVICE_ACCOUNT_NAME@$PROJECT_ID.iam.gserviceaccount.com
  echo "annotated KSA custom-metrics-stackdriver-adapter with GSA $SERVICE_ACCOUNT_NAME@$PROJECT_ID.iam.gserviceaccount.com"

  gcloud pubsub topics create $PUBSUB_TOPIC
  sleep 5
  echo "Created Topic"

  gcloud pubsub subscriptions create $PUBSUB_SUBSCRIPTION --topic=$PUBSUB_TOPIC
  echo "Created Subscription to Topic"


  kubectl apply -f test-app.yaml -n $EXAMPLE_NAMESPACE
  echo "Deployed test application"

  gcloud projects add-iam-policy-binding projects/$PROJECT_ID \
    --role=roles/pubsub.subscriber \
    --member=principal://iam.googleapis.com/projects/$PROJECT_NUMBER/locations/global/workloadIdentityPools/$PROJECT_ID.svc.id.goog/subject/ns/$EXAMPLE_NAMESPACE/sa/pubsub-sa
  echo "Added workload identity to to pubsub-sa"
}

delete() {
  kubectl delete -f test-app.yaml -n $EXAMPLE_NAMESPACE
  kubectl delete -f https://raw.githubusercontent.com/GoogleCloudPlatform/k8s-stackdriver/master/custom-metrics-stackdriver-adapter/deploy/production/adapter_new_resource_model.yaml

  echo  $SERVICE_ACCOUNT_NAME@$PROJECT_ID.iam.gserviceaccount.com
  gcloud iam service-accounts delete $SERVICE_ACCOUNT_NAME@$PROJECT_ID.iam.gserviceaccount.com --quiet

  gcloud projects remove-iam-policy-binding projects/$PROJECT_ID \
      --role=roles/pubsub.subscriber \
      --member=principal://iam.googleapis.com/projects/$PROJECT_NUMBER/locations/global/workloadIdentityPools/$PROJECT_ID.svc.id.goog/subject/ns/$EXAMPLE_NAMESPACE/sa/pubsub-sa

  gcloud pubsub topics delete $PUBSUB_TOPIC
  gcloud pubsub subscriptions delete $PUBSUB_SUBSCRIPTION
}

create
If you are prompted to enter a condition choose “None”
Confirm Application is Working
Make the application pod is running
$ kubectl get pods

NAME                      READY   STATUS    RESTARTS   AGE
pubsub-7f44cf5977-rbztk   1/1     Running   0          16h
Make sure the hpa is running
$ kubectl get pods
NAME     REFERENCE           TARGETS         MINPODS   MAXPODS   REPLICAS   AGE
pubsub   Deployment/pubsub   0/2 (avg)   1         4         1          1m
Lets trigger an auto-scale event by sending messages to the echo topic.
for i in {1..200}; do gcloud pubsub topics publish echo --message="Autoscaling #${i}"; done
It’ll take 2-5 minutes for the scaling event to occur. Yes this is slow.
After awhile you should see that the pod number has increased and that is reflected on the hpa status as well
$ kubectl get hpa

NAME     REFERENCE           TARGETS     MINPODS   MAXPODS   REPLICAS   AGE
pubsub   Deployment/pubsub   25/2 (avg)   1         4         4          74m


$ kubectl get pods

NAME                      READY   STATUS        RESTARTS         AGE
pubsub-7f44cf5977-f54hc   1/1     Running       0                25s
pubsub-7f44cf5977-gjbsh   1/1     Running       0                25s
pubsub-7f44cf5977-n7ttr   1/1     Running       0                25s
pubsub-7f44cf5977-xglct   1/1     Running       0                26s
Troubleshooting
Always check the output of run-example.sh first. Odds are you didn’t have permissions to do something. You can always run the delete command and start all over
***NOTE: you’ll need to change the name of the service account because GCP does soft deletes on service accounts.
Problems
HPA has unknown under targets.
$kubectl get hpa

NAME     REFERENCE           TARGETS         MINPODS   MAXPODS   REPLICAS   AGE
pubsub   Deployment/pubsub   unknown/2 (avg)   1         4         4          64m
The reason for this is that some configuration just went wrong. Check to make sure every command executed correctly.
You can even check the logs from the custom-metrics pod to make sure nothing is wrong.
austin.poole@docker-and-such:~$ kubectl get pods -n custom-metrics
NAME                                                 READY   STATUS    RESTARTS   AGE
custom-metrics-stackdriver-adapter-89fdf8645-bbn4l   1/1     Running   0          5h11m
austin.poole@docker-and-such:~$ kubectl logs custom-metrics-stackdriver-adapter-89fdf8645-bbn4l -n custom-metrics
I1127 13:52:25.333064       1 adapter.go:217] serverOptions: {true true true true false   false false}
I1127 13:52:25.336266       1 adapter.go:227] ListFullCustomMetrics is disabled, which would only list 1 metric resource to reduce memory usage. Add --list-full-custom-metrics to list full metric resources for debugging.
I1127 13:52:29.127164       1 serving.go:374] Generated self-signed cert (apiserver.local.config/certificates/apiserver.crt, apiserver.local.config/certificates/apiserver.key)
....
Make sure that the external metrics APIService exists by querying the api-server.
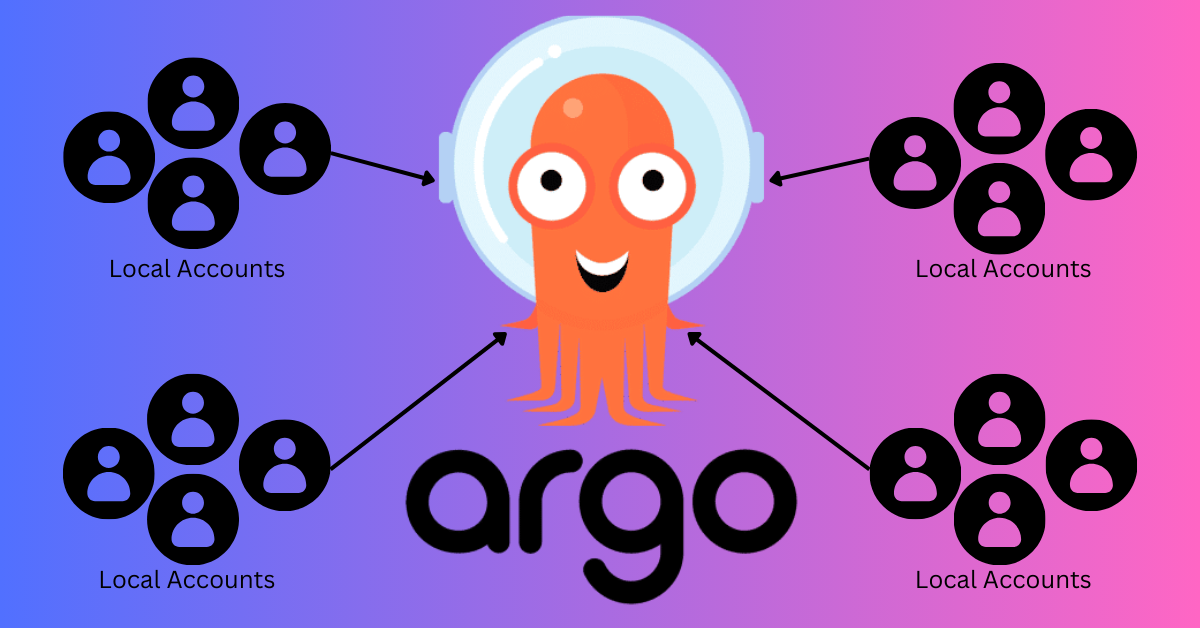
I ran into this reddit post when I was trying to create a local account via the argo-cd helm chart. I can’t comment on the post anymore but I can answer the question here
Helm Chart Version
Argo-cd helm chart version: 7.6.7
Custom Helm Values File
Create a custom values file called values.yaml
configs:
rbac:
policy.default: role:readonly # ***** Allows you to view everything without logging in.
##################################
# Assign admin roles to users
##################################
policy.csv: |
g, baylin2, role:admin
g, joesmith, role:admin
g, vpoole, role:admin
##################################
# Assign permission login and to create api keys for users
##################################
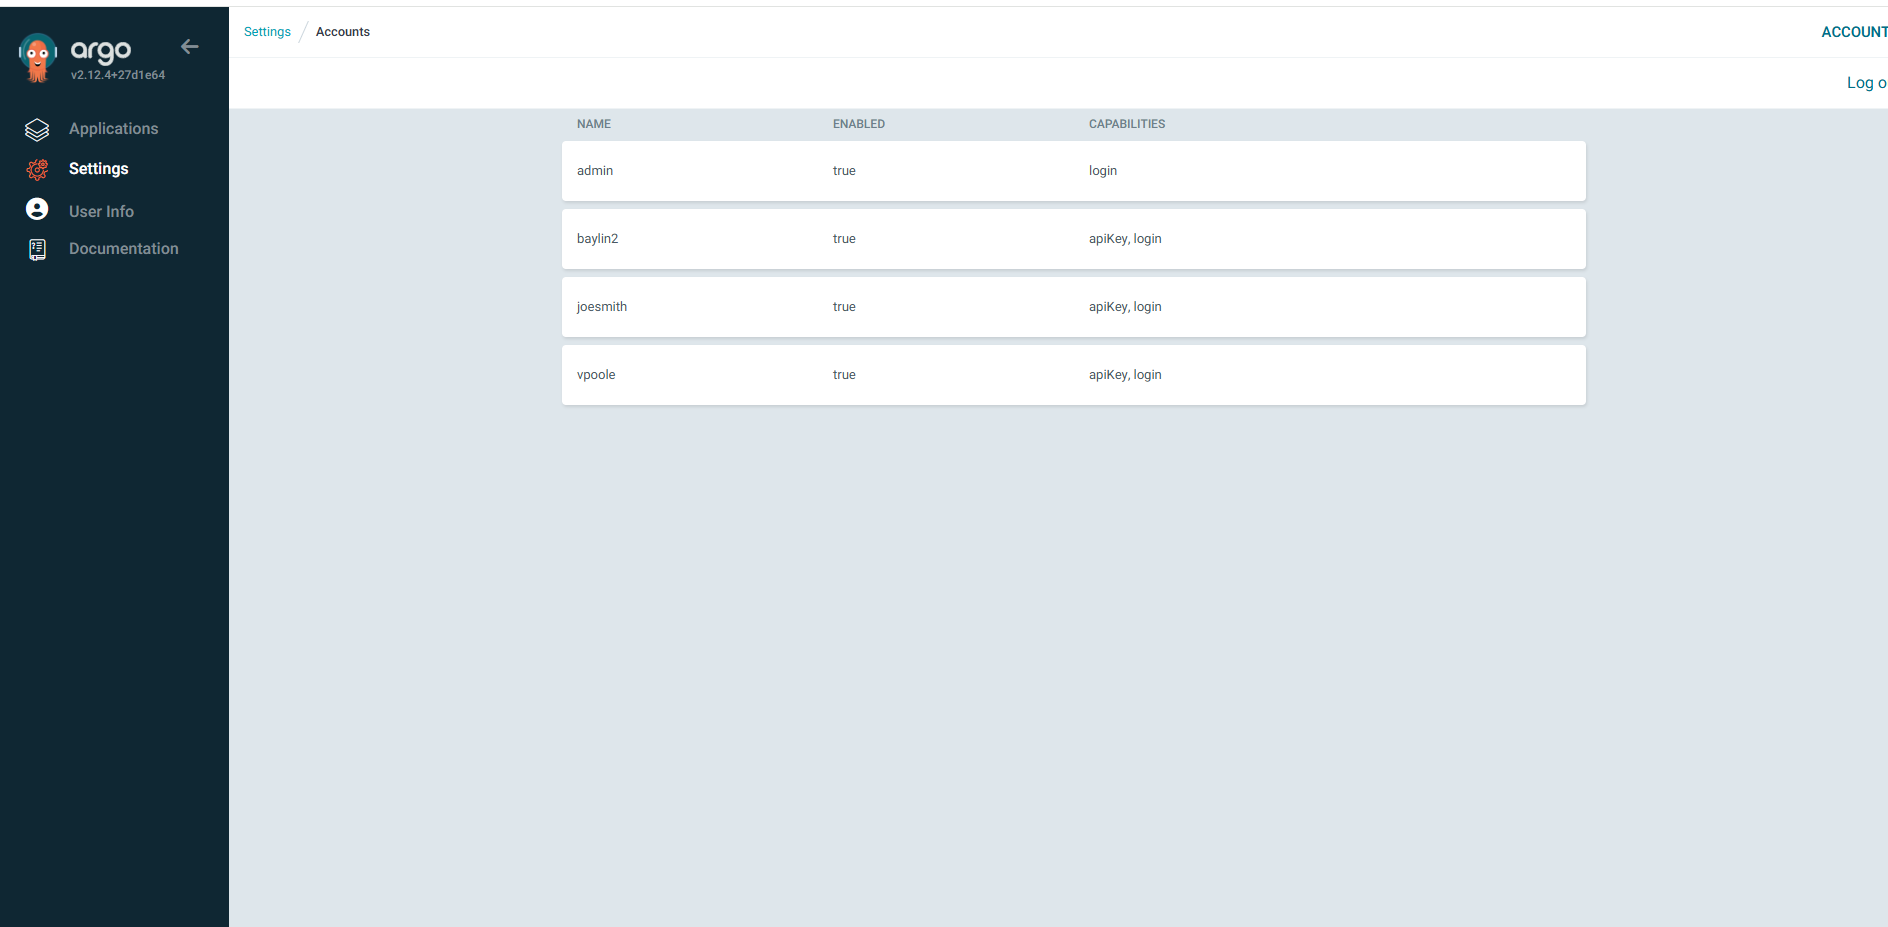
cm:
accounts.baylin2: apiKey, login
accounts.joesmith: apiKey, login
accounts.vpoole: apiKey, login
users.anonymous.enabled: true
params:
server.insecure: true #communication between services is via http
##################################
# Assigning the password to the users. Argo-cd uses bycypt.
# To generate a new password use https://bcrypt.online/ to generate a new password and add it here.
##################################
secret:
extra:
accounts.baylin2.password: $2y$10$p5knGMvbVSSBzvbeM1tLne2rYBW.4L6aJqN.Fp1AalKe3qh3LuBq6 #fancy_password
accounts.baylin2.passwordMtime: 2024-10-08T17:45:10Z
accounts.joesmith.password: $2y$10$p5knGMvbVSSBzvbeM1tLne2rYBW.4L6aJqN.Fp1AalKe3qh3LuBq6 #fancy_password
accounts.joesmith.passwordMtime: 2024-10-08T17:45:10Z
accounts.vpoole.password: $2y$10$p5knGMvbVSSBzvbeM1tLne2rYBW.4L6aJqN.Fp1AalKe3qh3LuBq6 #fancy_password
accounts.vpoole.passwordMtime: 2024-10-08T17:45:10Z
server:
service:
type: LoadBalancer